Since 2005, Salem Metal has been using a non-contact precision inspection system from Virtek to guarantee maximum efficiency on the shop floor while ensuring accuracy.
The LaserQC uses laser technology to capture more than 500 data points per second so every part inspection – whether first article or in-process – is fast and precise. A number of Salem Metal employees are trained on the system, ensuring parts can easily be checked any time during the work day. This keeps production flowing smoothly, reduces scrap, and virtually eliminates rework.
Whenever requested, Salem Metal can supply customers with a detailed 2D inspection report, increasing confidence and helping them meet their ISO, TQM, Six Sigma, and lean manufacturing reporting requirements. On occasion, the reports help customers identify and correct design issues.
Our investment in state-of-the-art inspection equipment is part of our overall commitment to running an efficient shop that provides our customers with high quality parts at a competitive price.

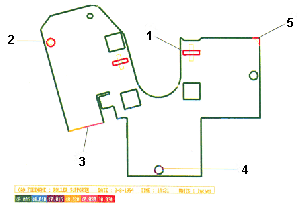
Colors show the accuracy of the part.
• Green areas are within 0.005 inch tolerance of the ideal dimensions.
• Blue areas are between 0.005 inch to 0.010 inch tolerance, etc.
• Red indicates edge location errors which are greater than 0.030 inch.
• Thin yellow lines show where edges should be located.
For further information and assistance about our systems already in place,
please contact us and we will be happy to discuss the details.
![]()


